- Dedicated Hosting
- Fast Dedicated Servers - Xeon
- Dedicated Server Packages
- Cheap Dedicated Servers
- Selecting the right Budget Server
- Virtual Private Servers
- VPS Hosting Review (Top 3)
- Windows VPS Hosting
- VPS Bandwidth
- More info on Win VPS
- Virtual Server Hosting Info
- Shared Web Hosting
- Top Web Hosting Reviews (Top 3)
- Shared Web Hosting
- Green Web Hosting
- Business Web Hosting
- Shared Server Hosting Matrix
- FreeBSD Topics
- Access our FreeBSD Forums
- Home
- How To Install FreeBSD
- Installing Webmin
- Installing ISPConfig
- How To Install Ports/PHP/Perl
- How To Install Apache
- Software Porting
- Dedicated Server Hardware Config
- FreeBSD Security
- Benefits Installing FreeBSD
- IT Information Menu
- Green IT
- What is Green Hosting
- Benefits of Green IT
- Server Control Panel
- The Archives
- Web Hosting Comparison
- Server OS Comparison
- MySQL, SQL, and PostgreSQL
- Pros and cons of Server Packages
- Hosting Services
- Server Software Configuration
- Server Hardware Questions
- Reasons for your own server
- Video Card Drivers
- Cheap Vs High Performance Servers
- What is a Virtual Server?
- Server Hardware
- Used servers
- Buy Used Servers
- 1U Servers
- Server Memory
- 667 FB DIMM
- Managed Hosting Info
- Managed Web Hosting
- Managed Web Hosting Services
- Managed Web Hosting Pros
- Managed Dedicated Hosting
- Small Business Hosting
- Managed Web Hosting Cons
- Website Related Info.
- How to Build a Website Overview
- Free Web Hosting Sites
- Online Business Help
- Protecting your Brand Online
- Help with Online Reputation

 |
How to Install FreeBSD - FreeBSD 7 i386 installation guide - Part II
These are the FreeBSD installation instructions for installing FreeBSD i386. They are continued form Part I of how to install FreeBSD i386. In part one we just finished setting up the partitions and are now ready to install the operating system.
FreeBSD Installation continued
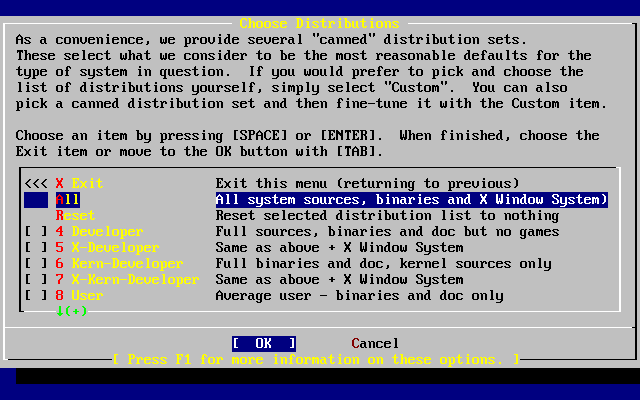
13.Choose distribution set
Here you need to choose what binaries you want to install on your system. It’s recommended you choose “All” by using the arrow keys and press Enter to install all of them, including system sources and documents, unless disk space is something you are concerned about.
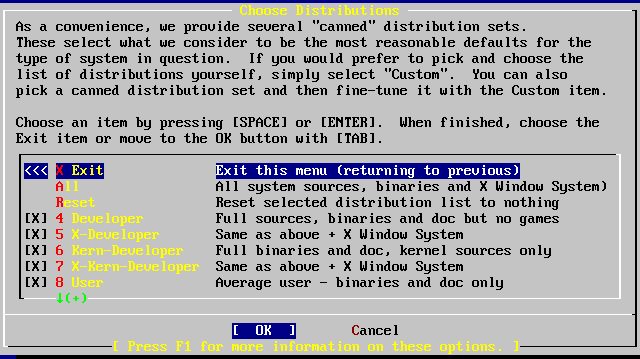
14.Next you’re presented the chance to install the Ports collection. As mentioned above, choose “Yes” to install it unless disk space is something you concern about. Then press “Enter” to continue.
15. Now you’re back to the Choose Distribution menu. Select Exit with the arrow keys, ensure that [ OK ] is highlighted, and then press “Enter” to continue.
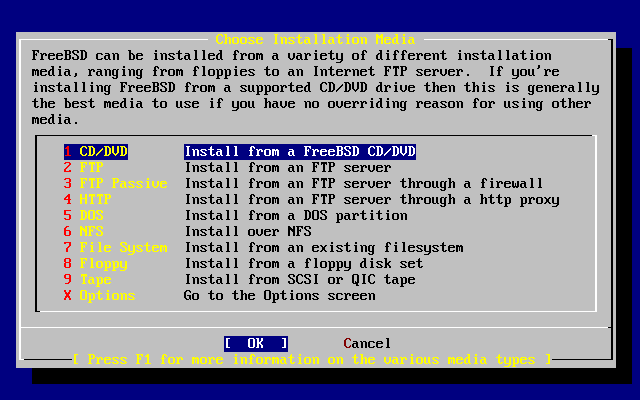
16. Next screen is to choose installation media. Here we’ll use an install CD. So use the arrow keys to highlight Install from a FreeBSD CD/DVD. Ensure that [ OK ] is highlighted, then press Enter to proceed with the installation.
17.Next, select “Yes” to confirm your choices and installation will now start, unless you want to change your choices or cancel installation.
18. Then you’ll the installation progress screen. When everything is done. You’ll see a congratulation message saying the installation is completed. Press “ENTER” to go the post installation configurations.
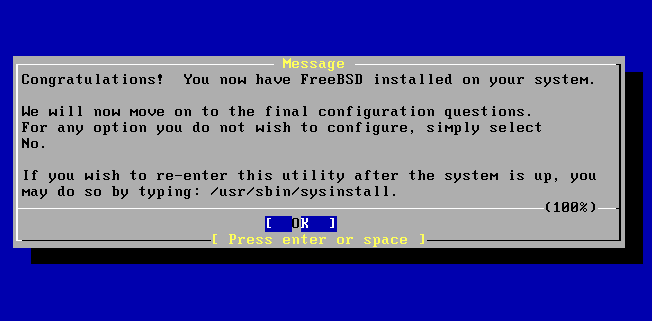
Post installation configurations…
19. For post installation configuration, the first one is to configure the network interface. Select “yes” when prompted and then in the next screen, use arrow keys to highlight the interface you want to configure, usually the first one, then press “ENTER” to continue.
20. Select “No” when asked if you want to try IPv6 configuration.
21. Select “No” when asked if you want to try DHCP configuration.
22. Then you come to the screen where you can configure hostname and TCP/IP settings of the interface you selected.
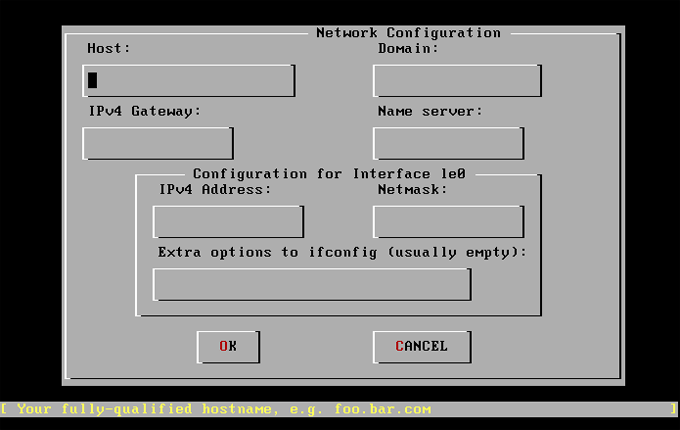
Use Tab to select the information fields and fill in appropriate information:
Host: The fully-qualified hostname, like servername.example.com
Domain: The name of the domain that your machine is in, such as example.com
IPv4 Gateway: IP address of host forwarding packets to non-local destinations. The IPv4 Gateway is also known as the default gateway or default route.
Name server: IP address of your local DNS server.
IPv4 address: The IP address to be used for this interface was 192.168.0.1
Netmask: such as 255.255.252.0.
Extra options to ifconfig: can be left blank
23. Use Tab to select [ OK ] when finished and press Enter.
24. when prompted if you want to bring up this interface, select “yes” and press Enter if the interface is ready, otherwise select “No”
25. when prompted if you want to use this machine as gateway, select “No” and press Enter, unless otherwise intended.
26. When prompted if you want to configure inetd and the network services, select “No” for now, you can always change it at a later time.
27. When prompted if you want to enable SSH, select “Yes” and press Enter so that you can login remotely in a secure way.
28.you’ll then be prompted for configuring the following services, select “No” and press Enter to continue
Anonymous FTP
NFS server,
NFS client,
system console settings,
time zone
Linux binary compatibility
mouse settings
install packages
add users and groups
29.After you finish settings for above items, you’ll be prompted to set password for root user. Choose a password that’s 8 digits or more and complex enough and key in to set password for root.
30.The installation will continue after the password is successfully entered. You’ll then be asked if you want to visit general menu and change some other options. It’s default to “No”. Press “Enter” to continue.
31.Now installation is completed. You’re back again to the main installation menu. Use “Tab” to highlight “Exit Install” and then press “Enter” to reboot the system. Please remove install CD/DVD at this moment.
32.if you want to set time zone or add user/groups, after the system restarted, login with root user and run “sysinstall” command to bring up the installation GUI again.
Use arrow keys to highlight “Configure” and then press “Enter”.
In next window, highlight “Time Zone” with arrow keys and then press “Enter” to launch time zone setup program.
When asked “if this machine’s CMOS clock set to UTC”, press Enter to keep default “No” and continue
Then use arrow keys and “Enter” to select the continent/country/time zone this machine is located in
when asked if a abbreviation looks reasonable, select “Yes” and press Enter to finish time zone set up.
To exit sysinstall, use arrow key to highlight “Exit” and then press “Enter”. In next window, use “Tab” to highlight “Exit Install” and then press “Enter” to exit sysintall.
33.if you want to add user/groups, you can run “sysintall” again. But the command line is a lot simpler.
To add a group:
pw group add group_nameTo add a user:
pw user add user_name –m –d /home/user_name –s /bin/bash –c “user info” –G group_name
One thing to note, for a user to be able to su to root, it has to be in a group called "wheel".
Here is how to add an existing user to the "wheel" group:
Pw user mod user_name –G wheel
Looking for our FreeBSD Forums? We have moved them off our main page,just follow the link to our FreeBSD Forums page.

Custom Search
|
Copyright © 2009,2010,2011,2012,2013,2014,2015,2016,2017, WEBSERVER CONSUMER GUIDE
Please note:
(1) FreeBSD is a registered trademark of The FreeBSD Foundation.
(2) WEBSERVER CONSUMER GUIDE is in no way affiliated with The FreeBSD Foundation